create...collaborate...celebrate!
resources
for creative party & dining memories...


Creating Luminaries
- Use a large round balloon that fills to 12 inches in diameter
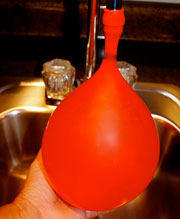
- Attach balloon top to a water nozzle
- Fill the balloon with water, (supporting the bottom) up to 12-14 inches diameter
- Holding the top closed, support the bottom, place in a pie plate
- Blow air into the balloon, flattening the top of the water (app. 6 inches in diameter)
- Tie off the end
- Place the balloon (on pie plate) in a freezer or if you live in a chilly climate, place the balloons (on the pie plates) outside.
-
It must be below freezing. Freeze for about 26-32 hours. It all depends on the temperature
As the water freezes the balloons may break away, not to worry - The key to luminaries is to get the outside wall about 1 1/2 inches thick.When you think the time is right, bring the luminaries in. *** Important to do this step in the kitchen sink. Or you may have water all over
- Run warm water (briefly) over the luminary, remove the balloon piece.
- The top will be flat and you will have to chisel an opening with a screw driver or knife, carefully!
- You want the opening big enough to put a small pillar candle in, and be able to light the candle
- Put back outside to prevent further melting
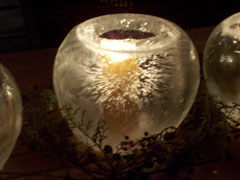
The luminaries are lovely along a sidewalk,
on an outside table, or on front steps.
I make them every year for the “Christmas Eve Family Party”
at Barb and Daveʼs home.
They are a welcoming sight, that is festive and beautiful.
Just for the cost of the balloons and candles.
on an outside table, or on front steps.
I make them every year for the “Christmas Eve Family Party”
at Barb and Daveʼs home.
They are a welcoming sight, that is festive and beautiful.
Just for the cost of the balloons and candles.